

The Secret Technique to Boost App Performance
The Secret Technique to Boost App Performance
Cloud & Backend EP 9 - It can also be cheaper to implement.

👉 Have you ever felt the pain of visiting a website like Amazon on a big sale day and finding the product pages taking forever to show up?
👉 What about going to a blog to check out some important article, but being unable to do so because the website is overloaded?
👉 And if that’s not enough, try to measure your frustration when there is a much-anticipated new movie on Netflix and all you get to see is the loading screen.
Of course, high traffic is a good problem to have for the owner of a website. It means people like the stuff you are offering.
But if you are not careful, the situation can quickly spiral into chaos and end up alienating your user base. Ultimately, it means loss of business whether in terms of viewership time, sales, or even general user goodwill.
As a developer, you can help your organization avoid this situation.
Though there are several techniques you can use, one of the best ways to boost application performance is pre-caching.
The reason:
Pre-caching is cost-effective.
Pre-caching is also dead simple to implement.
Hello 👋 and welcome to a new edition of the Cloud & Backend newsletter.
In this post, I explain the concept of pre-caching, how you can implement it, and when you should go for it.
Here’s the full agenda:
🤖 What is Pre-caching?
🏖️ Why the Need for Pre-caching?
💼 Steps to Implement Pre-caching
🧭 Pre-caching Demo with Node.js
⚖️ Server Side Pre-caching
🧶 Best Practices for Pre-caching
🤖 What is Pre-caching?
Pre-caching is a technique used to proactively store or cache data in anticipation of future requests.
The idea is to cache commonly accessed data or resources in advance so that you can deliver it to the end user faster when requested.
Check out the below illustration that shows how pre-caching works in an overall system context.
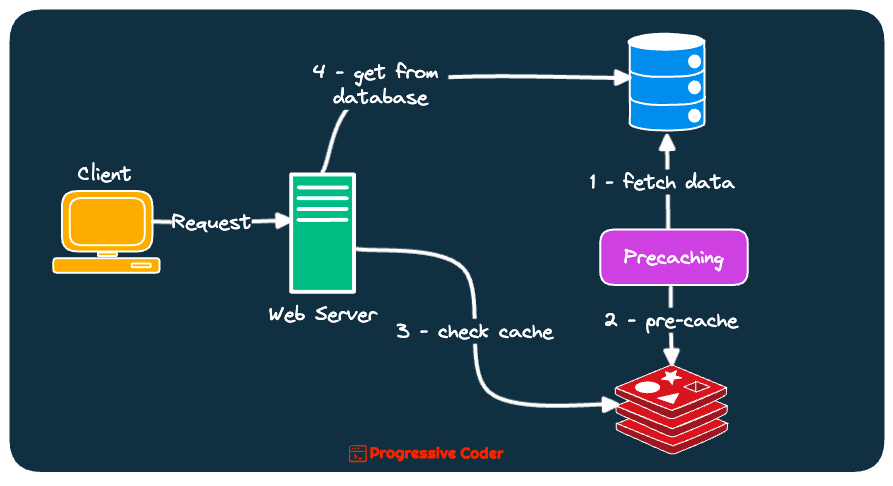
The great part about pre-caching is that you can do it on the client-side (web browser) as well as on the server side (CDNs).
Either way, the aim of pre-caching is to make your application feel faster and snappier for the end user.
🏖️ Why Pre-caching?
Does pre-caching sound like a lot of trouble?
Why bother worrying about it?
In my experience, the advantages of pre-caching outweigh the difficulties.
Here are a few important benefits:
👉 Performance Improvement
When you pre-cache data, you are reducing the load time for your application. An application with a high volume of traffic can greatly benefit from this.
👉 Improvement in User Experience
Who likes applications that feel like a slog to navigate?
Faster load times due to pre-caching improves the user experience. It also improves the overall availability of your application.
👉 Cost Savings
Pre-caching helps you reduce the costs of running the application.
For example, if you pre-cache some data on a CDN, you are reducing the load on the origin server. This saves bandwidth and reduces the server cost.
👉 Security
Though it’s an indirect benefit, pre-caching lets you improve the overall security of your assets.
It blunts the impact of DoS (Denial of Service) attacks since the application won’t have to serve the pre-cached resources from the origin server.
Let’s now look at the steps needed to implement pre-caching.
💼 Steps to Implement Pre-caching
In pre-caching, you store a copy of the data in a location closer to the user or store the data in advance so that it is quickly available when needed.
Here are the high-level steps you need to implement pre-caching.
👉 First, you must identify the data or resources that are accessed frequently. Typically, these resources are good candidates for pre-caching.
For example, most popular blog posts, bestseller product lists, and so on. You can also include images, JS files, and stylesheets in the pre-caching list.
👉 Next, you need to decide on the caching system to store the pre-cached data.
You could go for a local cache on the user’s device or even a distributed cache spanning multiple servers. The decision depends on the importance of the resource.
👉 Next, you pre-populate the cache with the identified resources. You can configure the system to perform this step automatically during the system initialization phase.
Alternatively, you can also populate the cache on an on-demand basis as the data is accessed by the users. Remember, pre-caching is all about being proactive.
👉 Once the setup is ready, you can let your system do the job.
Whenever the system needs to access pre-cached data, it can retrieve directly from the cache instead of fetching from a slower external source.
Let us now see a basic pre-caching demo.
🧭 Pre-caching Demo with Node.js
Here’s a very rudimentary approach to implementing pre-caching in something like Node.js and Express.
const express = require('express');
const nodecache = require('node-cache');
require('isomorphic-fetch');

//Setting up Express
const app = express();

//Creating the node-cache instance
const cache = new nodecache({stdTTL: 10})

//We are using the fake API available at <https://jsonplaceholder.typicode.com/>
const baseURL = '<https://jsonplaceholder.typicode.com/posts/>';

//Pre-caching Popular Posts
[1, 2, 3].map(async (id) => {
    const fakeAPIURL = baseURL + id
    const data = await fetch(fakeAPIURL).then((response) => response.json());
    cache.set(id, data);
    console.log(`Post Id ${id} cached`);
})

//API Endpoint to demonstrate caching
app.get('/posts/:id', async (req, res) => {
    const id = req.params.id;
    if (cache.has(id)) {
        console.log('Fetching data from the Node Cache');
        res.send(cache.get(id));
    }
    else {
        const fakeAPIURL = baseURL + id
        const data = await fetch(fakeAPIURL).then((response) => response.json());

        cache.set(req.params.id, data);
        console.log('Fetching Data from the API');
        res.send(data);
    }
})

//Starting the server
app.listen(3000, () => {
    console.log('The server is listening on port 3000')
})
The example uses the node-cache library to create an in-memory cache.
To simulate how pre-caching works, the program simply assumes that posts 1, 2, and 3 are extremely popular posts and suitable candidates for pre-caching.
The data for these posts are pre-fetched during the application startup process and stored in the cache object.
When a request is made for these specific posts, the application fetches the data directly from the cache instead of calling the actual API source.
⚖️ Server Side Pre-caching
Since we are more interested in the backend side of things, let’s look at a couple of ways to perform server-side pre-caching.
🔮 Content Delivery Networks or CDNs
In this method, you store a copy of the data on servers distributed worldwide.
The geographic relevance of data plays a key role in determining what data to store where. For example, a streaming platform like Netflix might choose to pre-cache different movies in CDNs located in North America and the Asia Pacific regions since user preferences will inevitably vary from region to region.
Here’s an illustration:
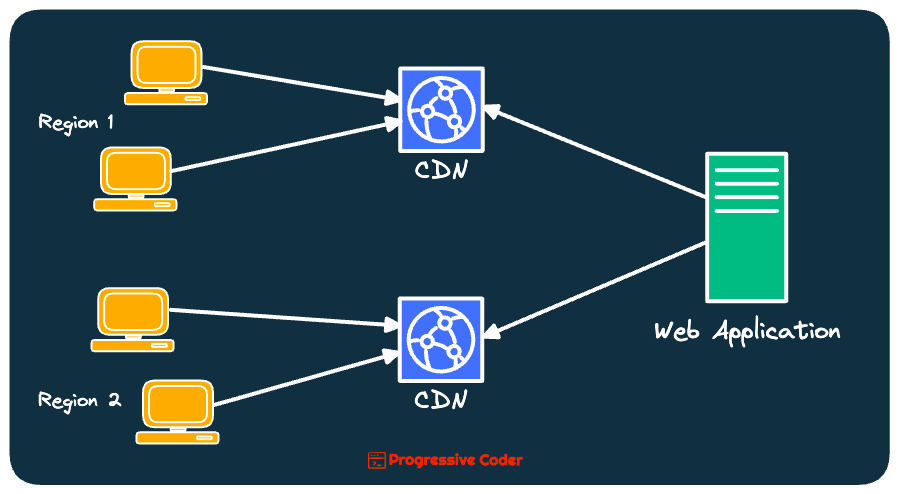
When a user makes a request for some data, it is delivered from the server that is closest to the user.
This in turn reduces the time to serve the request and makes your application faster from the user’s perspective.
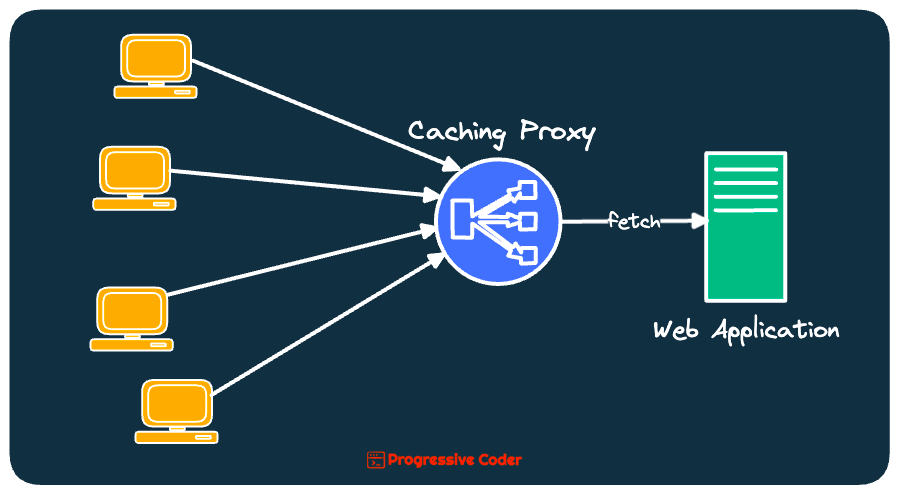
🪄 Caching Proxy Server
In this approach, a server sits in front of the origin server and doubles up as a caching layer that stores a copy of the data.
When a request comes from the user, the proxy server delivers the data directly without having to make a request to the origin server.
The below illustration describes the same.
Popular web servers such as Nginx can play the role of a caching proxy server. All you need to do is write the proper configuration.
For example, here’s the configuration to cache all files with the extension jpeg/jpg, png, CSS, and js for 60 seconds.
# configure the proxy server to cache all assets for 1 hour
proxy_cache_path /var/cache/nginx levels=1:2 keys_zone=static_cache:20m inactive=60m;

# set the cache control header to a max-age of 1 hour
add_header Cache-Control "public, max-age=3600";

# cache all assets
location ~* \\\\.(jpg|jpeg|png|css|js)$ {
    proxy_cache static_cache;
    proxy_cache_valid 200 60m;
    proxy_pass http://origin_server;
}
🧶 Best Practices for Pre-caching
Pre-caching is an extremely useful technique to improve your application’s performance.
However, you should still follow some best practices to make sure that pre-caching gives you the desired results.
Here are a few best practices to keep in mind:
👉 Cache only necessary resources
Don’t cache useless data resulting in wasted storage space and nullifying the advantages of pre-caching.
You should only cache the resources that have the greatest impact on performance management.
👉 Don’t forget to version pre-cached resources
Even pre-cached resources can get updated in the future. You should make sure to version the resources.
When a resource gets updated, you need to increment the version number to keep track of subsequent updates.
👉 Use a Content Delivery Network (CDN)
CDNs help reduce the time it takes to load resources.
You should leverage a CDN to distribute resources to the edge servers that are located closer to the users.
👉 Use tools to enable pre-caching
Don’t reinvent the wheel.
Instead of building your own solutions for pre-caching, use tools such as CDNs and caching proxy servers to enable pre-caching.
⚽ Over to you
Have you used pre-caching in your application?
If yes, what tools you used? And did you go for client-based pre-caching or server-based?
Leave your replies or thoughts in the comments section.
And that’s all for today.
If you found today’s post useful, give the post a like and consider sharing it with friends and colleagues.
Wishing you a great week ahead! ☀️
See you later.